Traditional workflow, from SDK to Vitis.

📖 Table of Contents
📝 This post was initially released on the HLS Works Blog in 2020. The post was moved to this website after HLS Works closed in Sep 2021.
Traditional workflow, from SDK to Vitis.⌗
Intro⌗
Vitis was presented almost a year ago, but I was reticent to write an update until a stable version was released and more documentation was available. But now I think we have waited enough.
First of all, what is Vitis? Vitis is a replacement for the Xilinx SDK, SDSoC™ and SDAccel™”. Xilinx has unified their different Software Development Tools into one, Vitis. This merge has come with some important changes that may confuse users, especially those used to the SDK. In this blog, I will try to explain how some common SDK operations are performed in Vitis.
How we used to work with Vivado and the SDK?⌗
Hardware is exported from Vivado through a hardware description file (.hdf), which is actually a .zip containing all the files needed by the SDK to understand the platform designed in Vivado. It may include the bitstream file (.bit) as well. When imported to the SDK, the HDF file is unzipped so it is possible to see the contents. Then, we can create a board support package (BSP) or an application project. The first applies when creating bare metal or FreeRTOS based apps. If we chose the second, SDK will ask for a domain: either Linux, FreeRTOS or standalone. If we chose either bare metal or FreeRTOS, it will allow us to use an existing BSP or create one within that window. On the other hand, if we create a Linux project, no BSP is required, but it’s necessary to specify the operating systems characteristics and the core(s) where it will run.
Finally, if we make a change on hardware, it’s necessary to re-export the new hardware from Vivado. Then, the SDK automatically updates the current hardware platform and rebuilds the workspace—if we’re lucky.
Now, in Vitis⌗
In Vitis hardware is imported through an XSA file (that replaces HDF). The XSA file is necessary to manually create a platform. A platform holds different domains. Each domain can be Linux, FreeRTOS or bare metal. Both standalone and FreeRTOS domains will contain the appropriate BSP. A platform can hold several domains that use the same type or have the same processors. For example, a platform could hold two standalone domains that use the same processor. A platform is based on a single XSA since it is the actual hardware definition. For that reason, Xilinx refers to platforms and hardware as the same thing in the documentation. That differs from the SDK, in which hardware was at the same level as BSP in the Explorer Pane, but it is the same concept in a different implementation.
Another change compared with the SDK is that application projects must reside within a system. A system holds different applications that run simultaneously. For example, In a Xilinx Ultrascale+ device with four A53 cores and two R5 cores, a system could be formed by several apps running simultaneously on the Linux domain (that takes all four A53 cores), and two bare metal apps running one on each R5 core independently. All the mentioned apps can be within a system.
In a system, the domains used cannot share processors. Each bare metal or FreeRTOS app uses just one specific processor. In contrast, there can be multiple apps running on the Linux domain independently of the number of apps within this domain and the Linux domain could occupy several or all application processors.
Let’s go in detail through the steps for exporting hardware and importing it into Vitis.
Vivado⌗
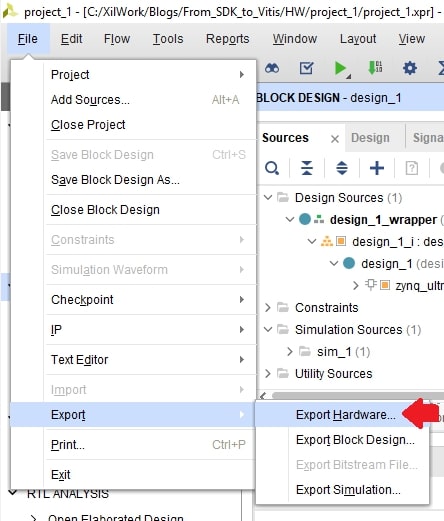
(1) File > Export > Export hardware
Open the File menu in the upper left and select Export > Export hardware.
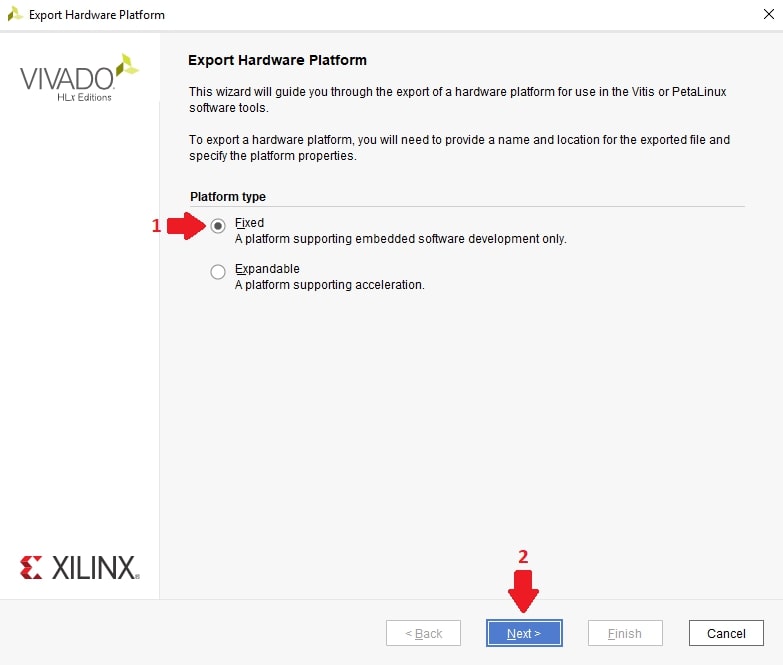
(2) Select “Fixed”
Expandible is targeted for acceleration workflows, which are not covered in this blog.
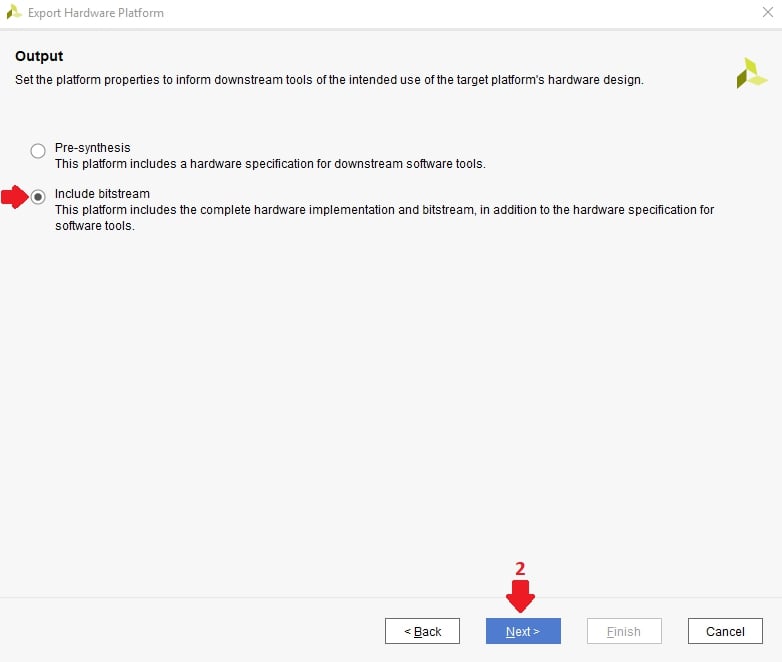
(3) Select “Include bitsetram” if need
Use the same criteria as in prior Vivado releases.
(4) Specify the target directory and the XSA file name
It can be the same directory as used in releases prior to v2020.2, but I do normally create a folder called “HW_specs” within the Vivado workspace for convenience.
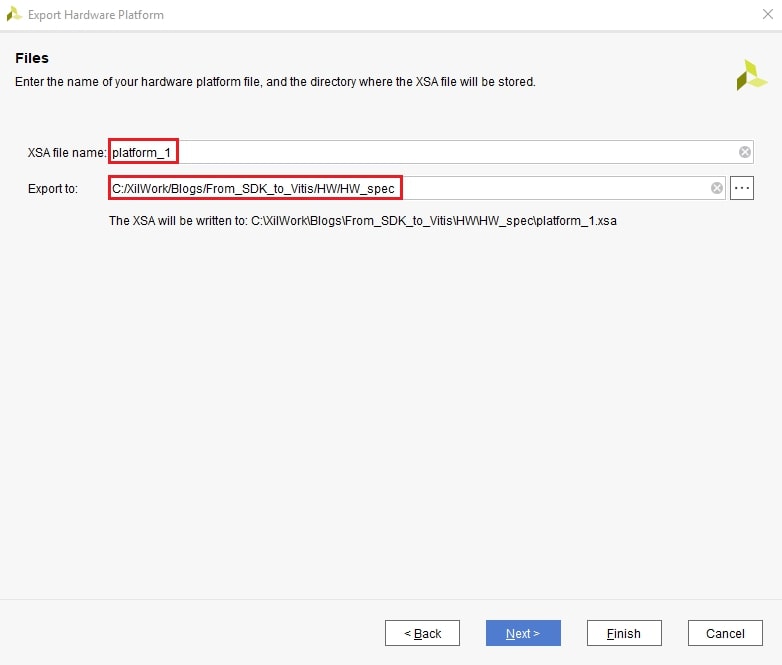
(5) Click Finish.
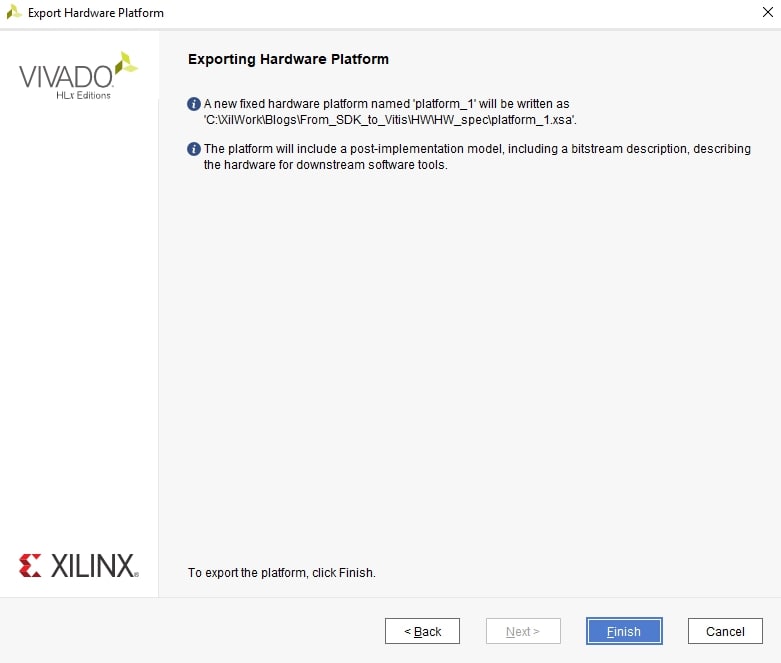
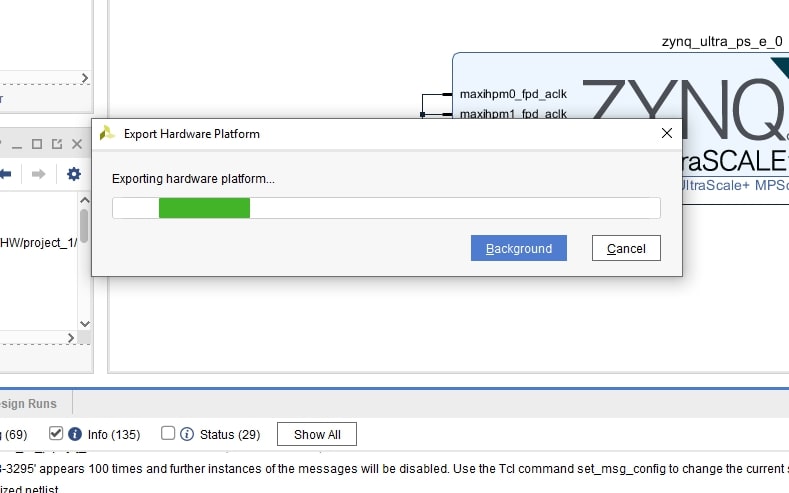
(6) Wait for the exporting process to finish.
I have had some trouble exporting when using Windows, so check the targeted directory to make sure that the XSA has been exported correctly. If not, just restart Vivado and try it again.
Vitis⌗
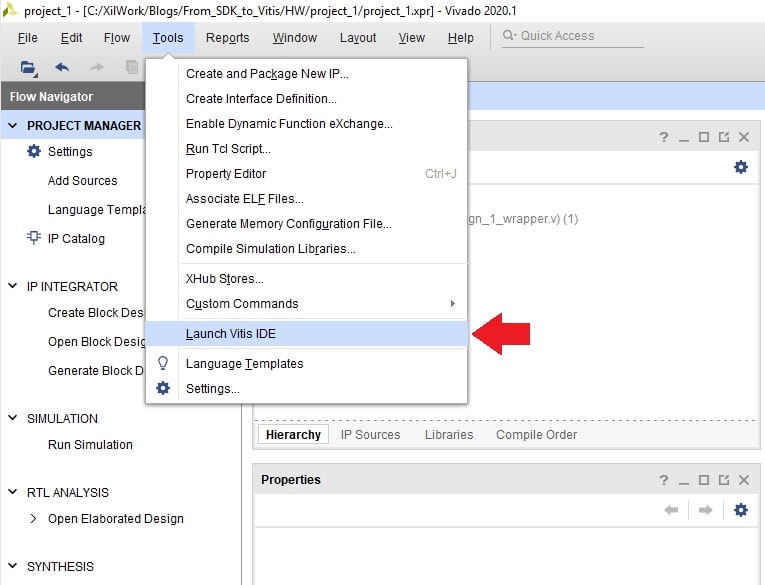
(1) Tools > Launch Vitis IDE.
To open Vitis directly from Vivado, click on “Tools”, then click on “Launch Vitis IDE”.
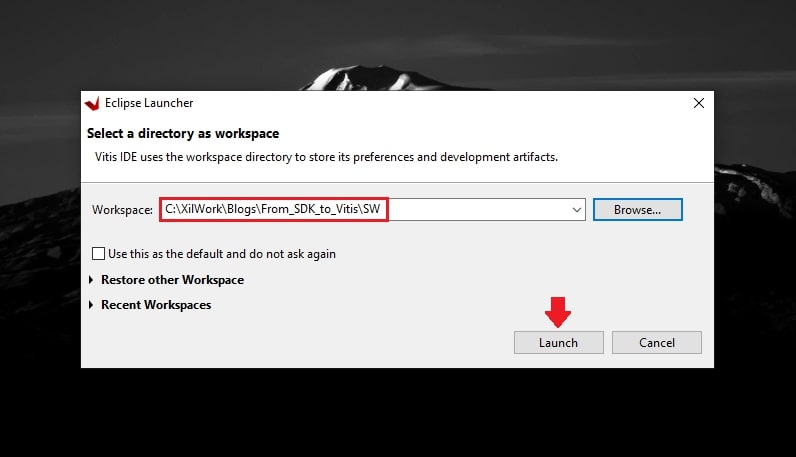
(2) Specify the workspace.
I normally use a folder called “SW” to separate hardware and software workflows.
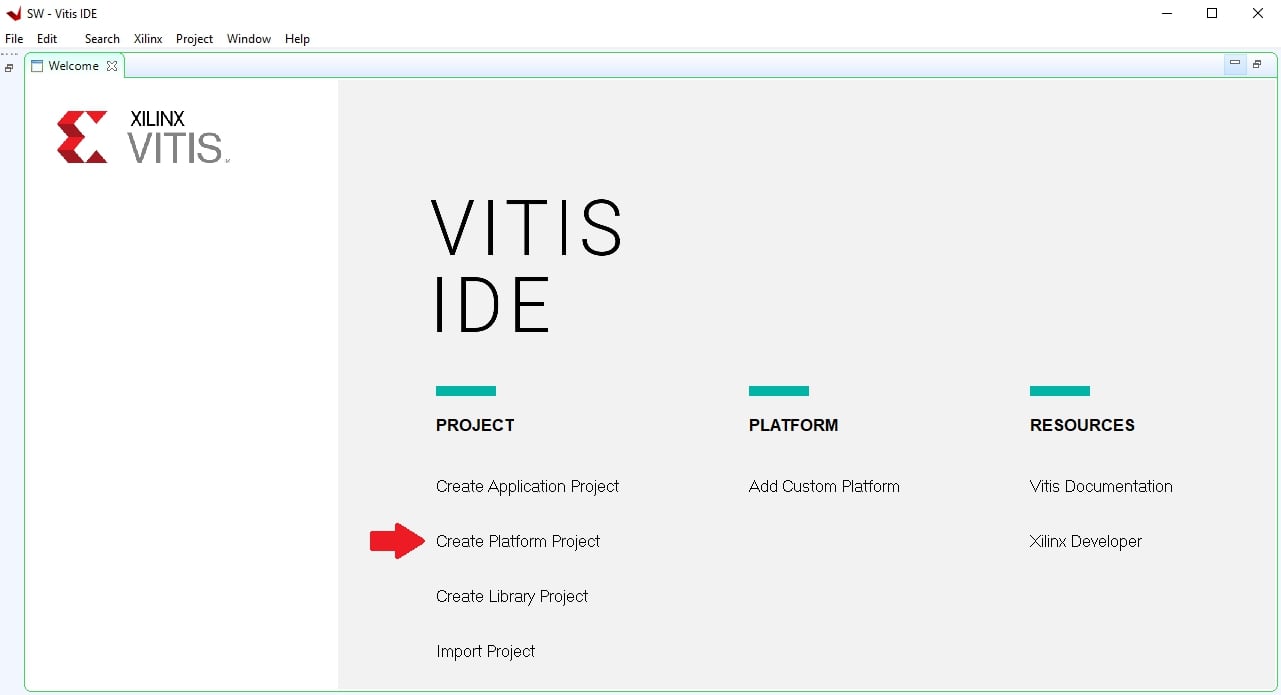
(3) Create a Platform project.
From the Vitis welcome menu, click on “Create Platform Project”.
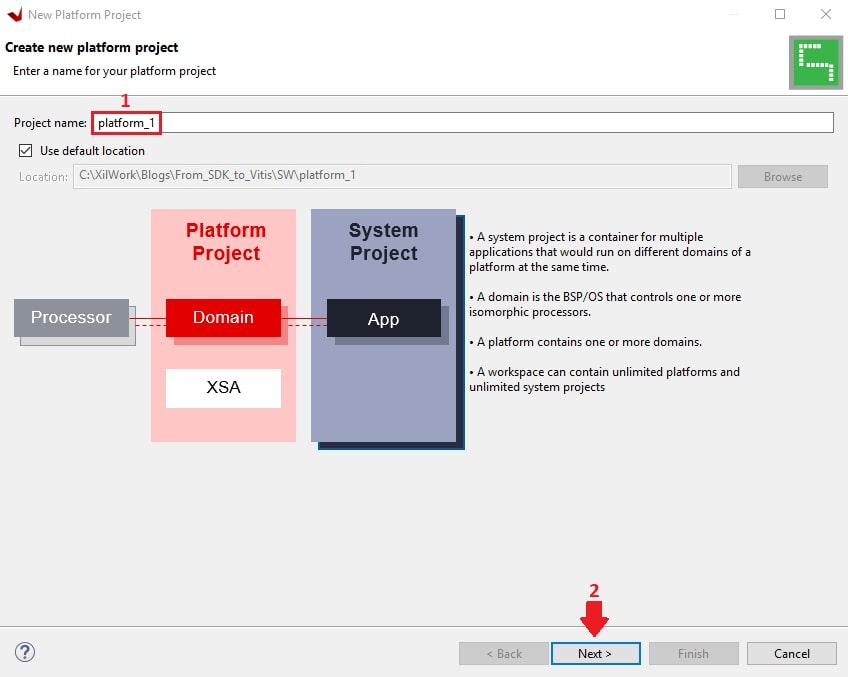
(4)Name the project
I normally give the platform the same name as the XSA file.
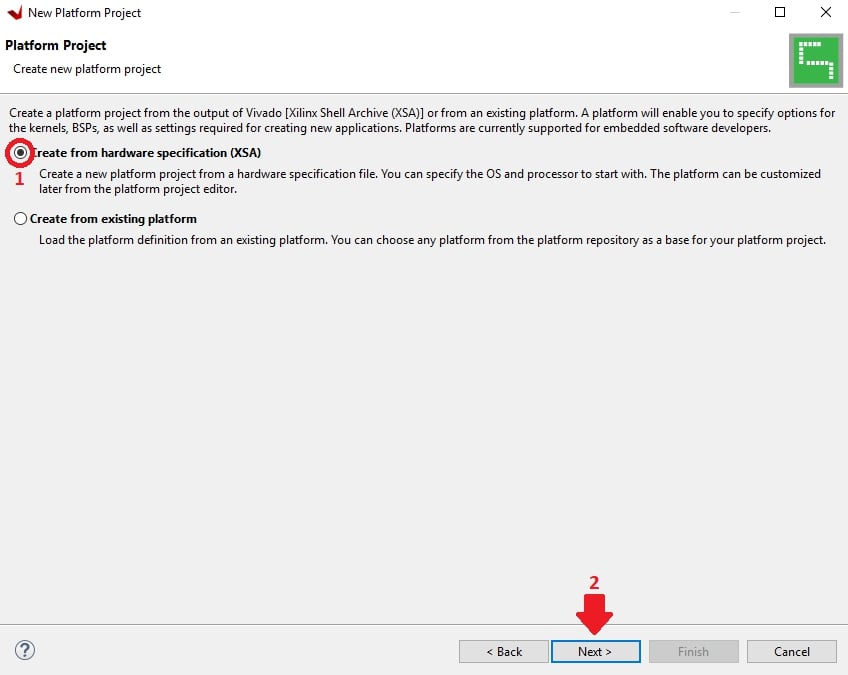
(5) Select “Create from hardware specification (XSA)”
The second option is used to duplicate a platform.
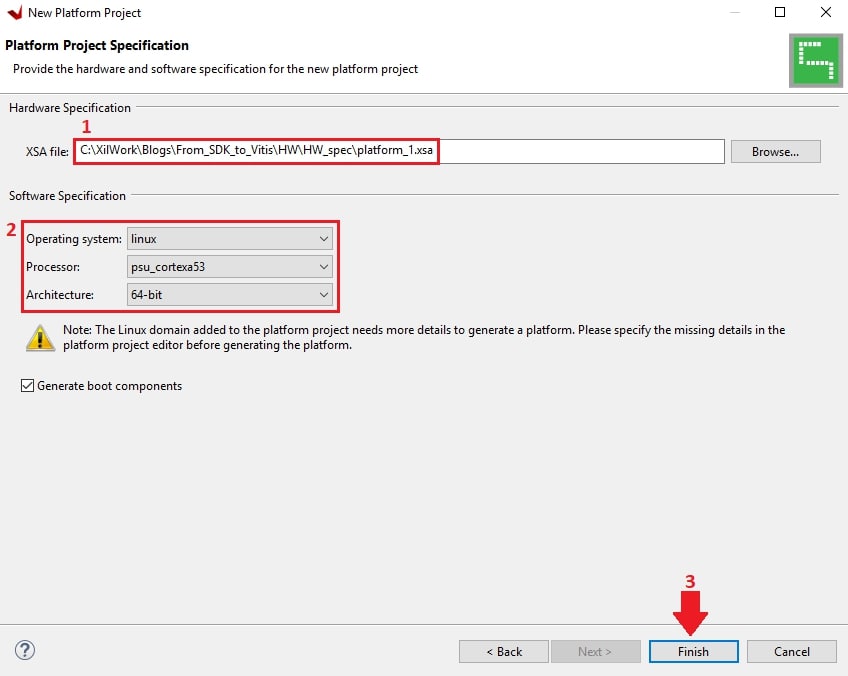
(6) Specify the XSA file location and the operating system.
The operating system is specified to create a default domain, but it will be possible to add other domains later.
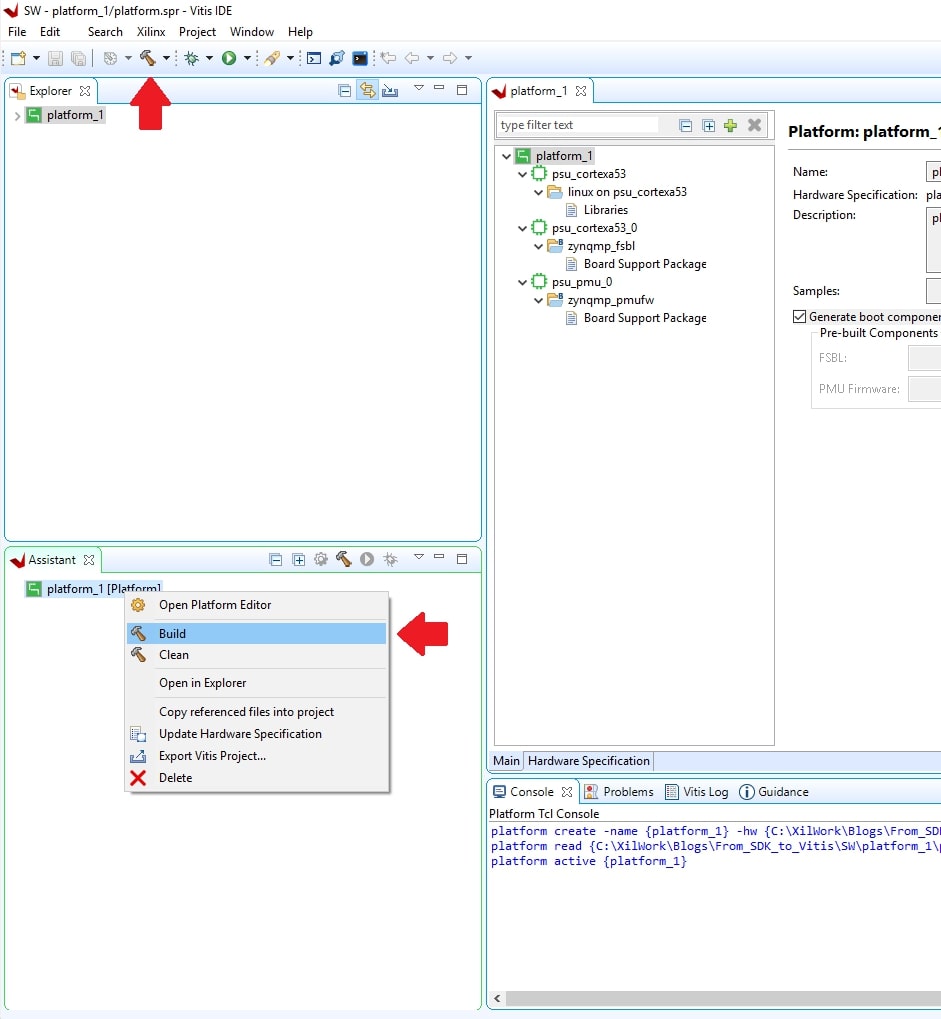
(7) Build the platform
It can be done in either way shown in the figure.
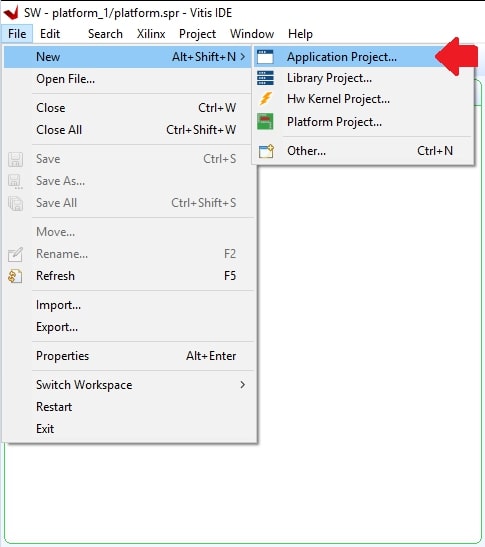
(8) File > New > Application project
Create an app.
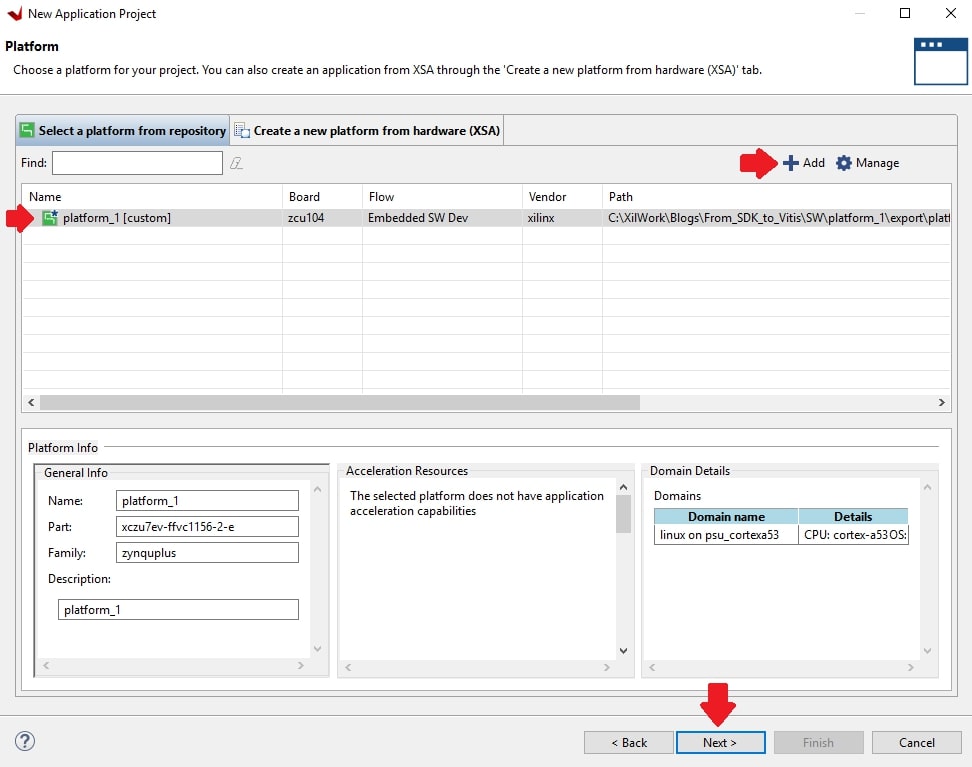
(9) Select an existing platform or create a new one
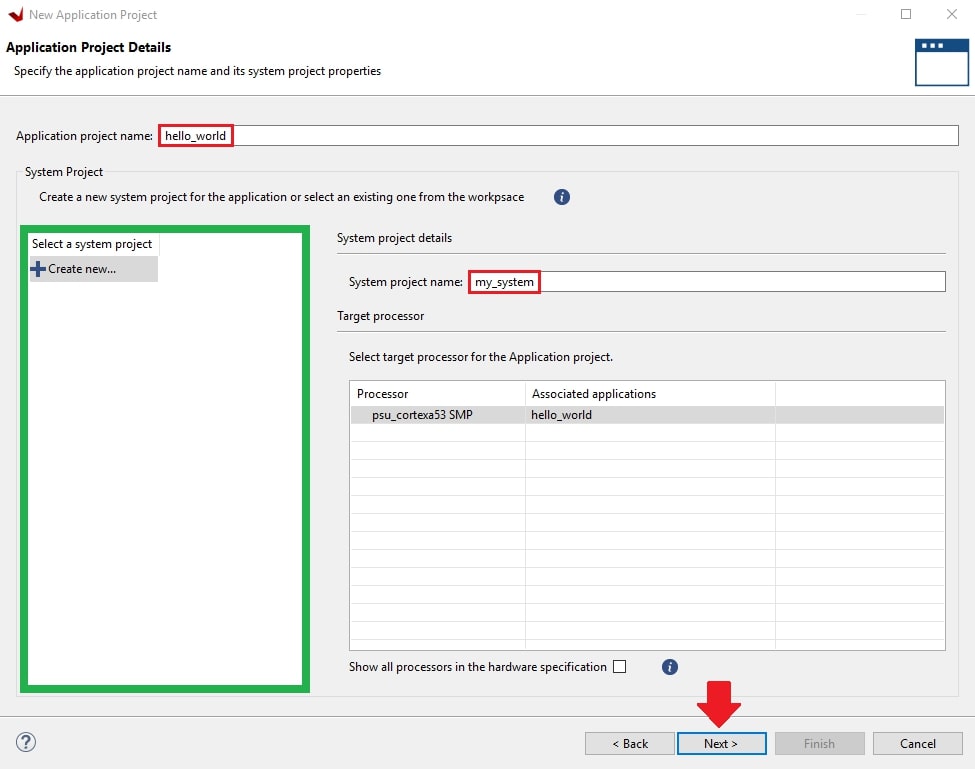
(10) Specify the system where the app will reside
By default, Vitis will ask for the details to create a new system, but it’s possible to use an existing one. This step differs from the SDK, which doesn’t use systems within projects.
(11) Finally, select an application template and click Finish.
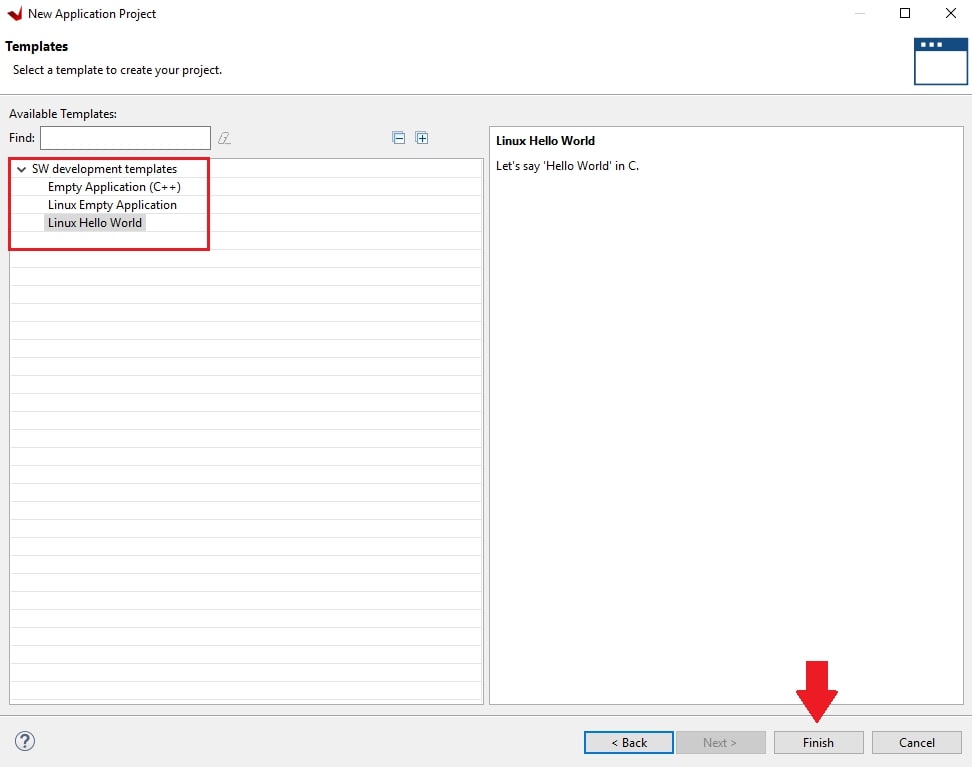
Change hardware⌗
When hardware changes, it’s necessary to re-export the XSA file from Vivado. Then, we can update the previous platform or create a new platform project and reference the app to the newly created one. I would recommend the first option when minor changes are made to the hardware to avoid messing up the workspace.
Update an already created one⌗
To update an existing platform, the newly exported XSA file must overwrite the XSA the platform is referencing. For example, if we want to modify a platform referencing “example.xsa”, we must export the new XSA with the same name “example.xsa” and in the same directory so that the previous XSA is overwritten. Finally, re-build the platform.
Create a new one and reference the app to it⌗
Following the steps written at the beginning of “Now, in Vitis”, create a platform based on the new XSA. Then, perform the following steps to reference the application to the new platform.
(1) Select the project.prj, then click on the dotted square next to the platform.
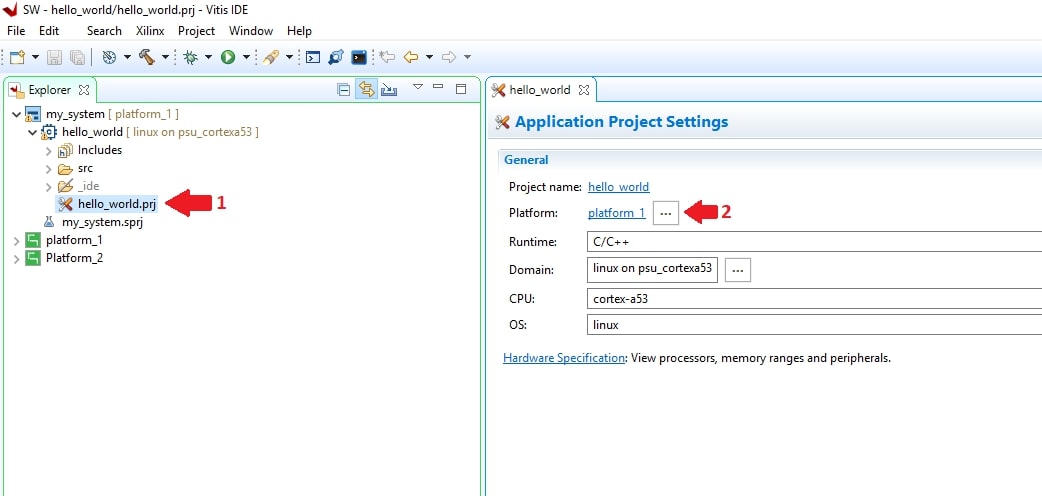
(2) Select a platform containing a compatible domain.
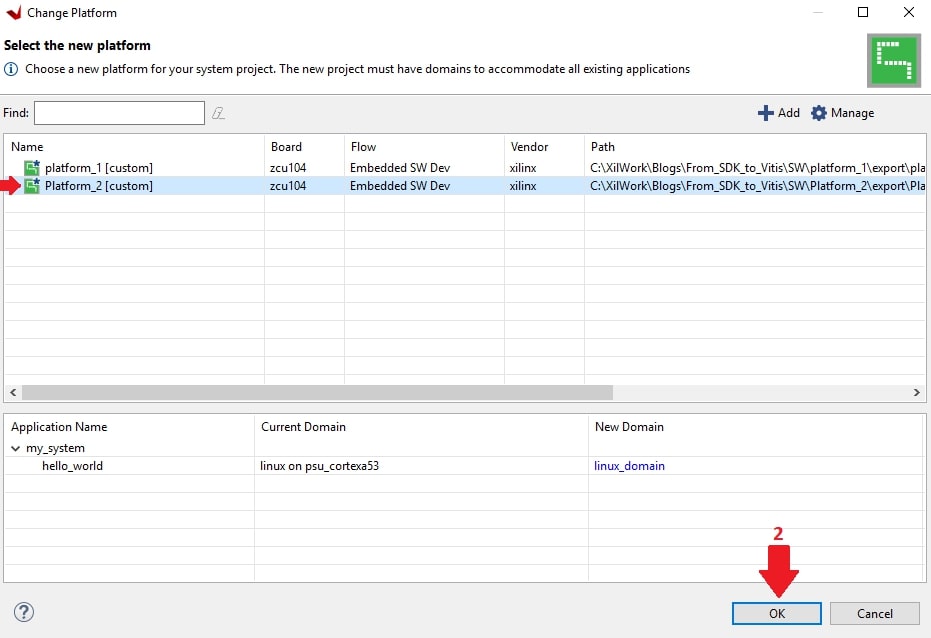
(3) Finally, select a compatible domain.
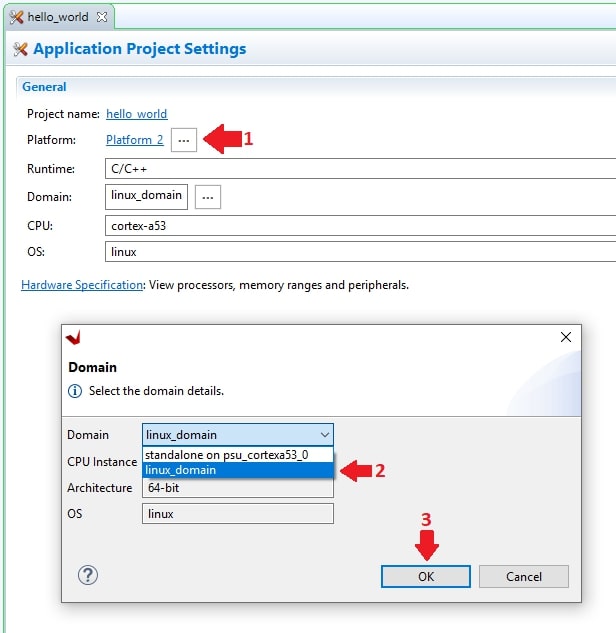
Vitis automatically selects a compatible one. You can also select one manually.
Hopefully you found this post useful. If you have any questions, feel free to leave a comment.